Nx workspace is the best for Angular monorepos and micro frontend architecture. It is simple to integrate and setup the module federation. However, many teams feels that they don’t require the full Nx ecosystem. Remove Nx Workspace Angular 21 is the very easy step to implement and make application easy to debug.
Developers can build micro front end applications using the custom webpack and webpack module federation using Angular 21 without any Nx integration.
In this guide, we will explore how to remove Nx workspace from angular 21 Micro Frontend application and convert to angular CLI with module federation architecture.
Table of Contents
- Existing Nx Micro Frontend Structure
- Why Remove Nx Workspace?
- Remove Nx Dependencies
- Install Custom Webpack
- Configure Angular CLI
- Set Up Module Federation
- Configure Host (Shell)
- Configure Remote Applications
- Update Routes and Shared Dependencies
- Replace Nx Commands
- Test the Migration
- Nx vs Angular CLI
- FAQ
- Conclusion
Existing Nx Micro Frontend Structure

Nx workspace looks like this:
apps/
  ├── shell-module
  ├── dashboard-module
  ├── products-module
libs/
  ├── shared-components
  ├── shared-services
nx.json
project.json
workspace.json
modulefederation.js

After migration, the structure becomes:
apps/
├──Shell-module/
├── Dashboard-module/
├── Products-module/
angular.json
package.json
webpack.config.js
modulefederation.js
Each application becomes an independent micro frontend Angular project.
Why Remove Nx?
Common reasons include:
- Simple project structure
- Easy understanding for developers
- Less dependenciesEasy to migrate
- Better CI/CD flexibility
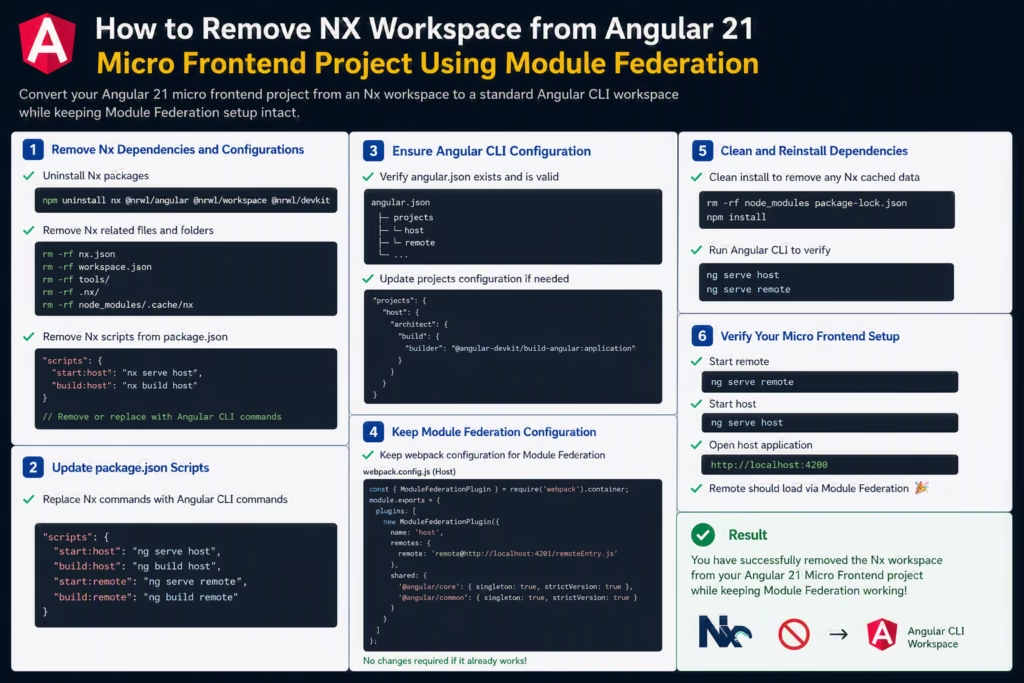
Step 1: Remove Nx Workspace Angular 21
Check installed Nx packages inside the package.json or with the below command:
npm list @nx/*Remove them:
npm uninstall nx
npm uninstall @nx/angular
npm uninstall @nx/workspace
npm uninstall @nx/module-federation

remove the npm cache clean
npm cache clean --f

install the dependency
npm install
Step 2: Install Custom Webpack Builder
Since Nx manage the webpack configuration automatically, we need Angular CLI to do it.
Install:
npm install -d @angular-builders/custom-webpackUsing this package Angular CLI use custom webpack configuration files.
Step 3: Install Webpack Module Federation
Install webpack package command :
npm install -d webpack webpack-cli webpack-dev-serverVerify versions:
npm list webpackStep 4: Configure Angular Builder
Update angular.json file.
Before:
{
"builder": "@nx/angular:webpack-browser"
}
After:
{
"builder": "@angular-builders/custom-webpack:browser",

  "options": {

    "customWebpackConfig": {

      "path": "webpack.config.js"

    }

  }

}
Step 5: Create Host (Shell App) Webpack Configuration
Create:
// webpack.config.js
const ModuleFederationPlugin =require("webpack/lib/container/ModuleFederationPlugin");

module.exports = {
  output: {
    uniqueName: "shell-App",
    publicPath: "auto"
  },
  optimization: {
    runtimeChunk: false
  },
  plugins: [
    new ModuleFederationPlugin({
      remotes: {
        dashboardApp:
          "dashboard@http://localhost:4203/remoteEntry.js",
         productsApp:
           "products@http://localhost:4201/remoteEntry.js"
      },
      shared: {
       "@angular/core": {
          singleton: true,
          strictVersion: true,
        },
        "@angular/common": {
          singleton: true,
          strictVersion: true
        },
        "@angular/router": {
          singleton: true,
          strictVersion: true
        },
         "@sharedApp": {
          singleton: true,
          strictVersion: true
        }
      }
    })
  ]
};
This configuration registers remote application which will be loaded dynamically.
Step 6: Create Remote App Webpack Configuration
Dashboard Remote Example:
const ModuleFederationPlugin =require("webpack/lib/container/ModuleFederationPlugin");

module.exports = {
  output: {
    uniqueName: "dashboard",
    publicPath: "auto"
  },

  optimization: {
    runtimeChunk: false
  },
  plugins: [

    new ModuleFederationPlugin({
      name: "dashboard",
      filename: "remoteEntry.js",
      exposes: {
        "./Module": "./src/app/dashboard/dashboard.module.ts"
      },
      shared: {
        "@angular/core": {
          singleton: true,
          strictVersion: true
        },
        "@angular/common": {
          singleton: true,
          strictVersion: true
        },
        "@angular/router": {
          singleton: true,
          strictVersion: true
        },
      "@Shared-component": {
          singleton: true,
          strictVersion: true
        }
      }
    })
  ]
};
This exposes Dashboard Module to the shell application.
Step 7: Configure Dynamic Routing
Host Application Routes:
import { Routes } from '@angular/router';
export const routes: Routes = [
  {
    path: 'dashboard',
   loadChildren: () =>import('dashboard/Module').then(m => m.DashboardModule)
  }
];
The Dashboard module loads only when users navigate to that route.
Step 8: Share Angular Dependencies
One of the biggest mistakes during migration is loading multiple Angular versions. We should share the angular version across the multiple applications.
Always share:
shared: {
"@angular/core": {
    singleton: true
  },
  "@angular/common": {
    singleton: true
  },
  "@angular/router": {
    singleton: true
  }
}
This prevents duplicate Angular runtimes.
Step 9: Update Package Scripts
Replace Nx commands with ng command in package.json.
Before:
{
  "start": "nx serve shell",
  "build": "nx build shell"
}
After:
{
"start": "ng serve",
"build": "ng build"
}
For multiple MFEs:
{
"start:shell:dv": "ng serve shell --port 4203 –configuration=dev",
"start:dashboard": "ng serve dashboard --port 4202",
 "start:products": "ng serve products --port 4201"
}
Running the Micro Frontend Architecture
Terminal 1:
npm run start:shell:dvTerminal 2:
npm run start:dashboardTerminal 3:
npm run start:productsAccess:
http://localhost:4200The shell application loads remote applications dynamically using module federation.
Nx vs Angular CLI + Module Federation
| Feature | Nx | Angular CLI |
| Monorepo Support | Excellent | Basic |
| Learning Curve | Higher | Lower |
| Build Complexity | Medium | Low |
| Dependency Management | Advanced | Standard |
| Setup Flexibility | Medium | High |
| Maintenance Cost | Higher | Lower |
FAQ
1. Can I remove Nx without affecting Module Federation?
Yes. Module Federation is a Webpack feature and works independently of Nx.
2. Does Angular 21 support Micro Frontends without Nx?
Yes. Angular 21 supports Micro Frontends using Custom Webpack and Module Federation.
3. Why remove Nx Workspace?
To simplify project structure, reduce dependencies, and use standard Angular CLI tooling.
4. Do I need Custom Webpack after removing Nx?
Yes. Custom Webpack is required to configure Module Federation in Angular CLI.
5. What happens to nx.json after migration?
You can safely delete it once all Nx configurations are removed.
6. Can shared libraries still work after migration?
Yes. Use TypeScript path mappings or shared npm packages.
7. How do I verify the migration?
Ensure the host app loads remote applications successfully and remoteEntry.js is accessible.
8. Is Angular CLI better than Nx?
Angular CLI is simpler for small to medium projects, while Nx is better for large monorepos.
9. Can I migrate one Micro Frontend at a time?
Yes. Incremental migration is the recommended approach.
Conclusion
Migrating from Nx workspace to Angular 21 with custom webpack and module federation gives better control over their architecture. Also, it will reduce the complexity of the application.
Configuring Module federation, developers can get the deeper knowledge of how host and remote applications communicate without relying on Nx workspace.
For small to medium size applications Angular CLI with custom webpack is easy to implement, maintain, upgrade and new developers can easily understand the project architecture.